To make a presentation interactive, identify where audience participation belongs in your deck, choose the right interaction type for each moment, select a tool that supports live audience engagement, give participants a simple way to join, and use the responses to adapt your session in real time.
You give a 45-minute presentation and then ask if anyone has questions. Silence. You have no idea whether anyone actually understood what you said, whether the content was relevant to them, or whether they were even paying attention for the last 20 minutes.
This is not a delivery problem. It is a structure problem. Most presentations are built for one-way communication and then expected to produce two-way results.
This guide gives you a clean five-step framework for fixing that, regardless of which tool you use or what software your slides are currently in. Interactive presentations consistently outperform passive slide decks because they turn audience members from listeners into participants.
If you are new to interactive presentations entirely, start with What Is an Interactive Presentation? first. That covers the definitions, the science, and the slide types in full. This guide covers the process of building one.
What Makes a Presentation Interactive?
An interactive presentation is one where the audience actively responds during the session rather than passively watching. Instead of a presenter talking at a room for 45 minutes, the audience votes on polls, answers quiz questions, submits word cloud responses, and asks questions through a live feed, all in real time from their phones.
The key word is during. An interactive element that happens after the presentation ends is a survey. An interactive element that happens inside the presentation, woven into the content at the right moments, is what changes how audiences experience and remember your session. That distinction is what this guide is built around.
Why Most Presentations Stay Passive
Three things keep most presentations one-way even when presenters want them to be more engaging.
- No clear process. Most presenters know they should add interactive elements but do not know when, how many, or what type.
- Tool friction. Switching between a slide deck and a separate polling tool mid-session feels disruptive, so presenters avoid it.
- Fear of silence. What if nobody responds? Low response rates almost always have a fixable cause, which Step 4 covers.
The five steps below address all three.
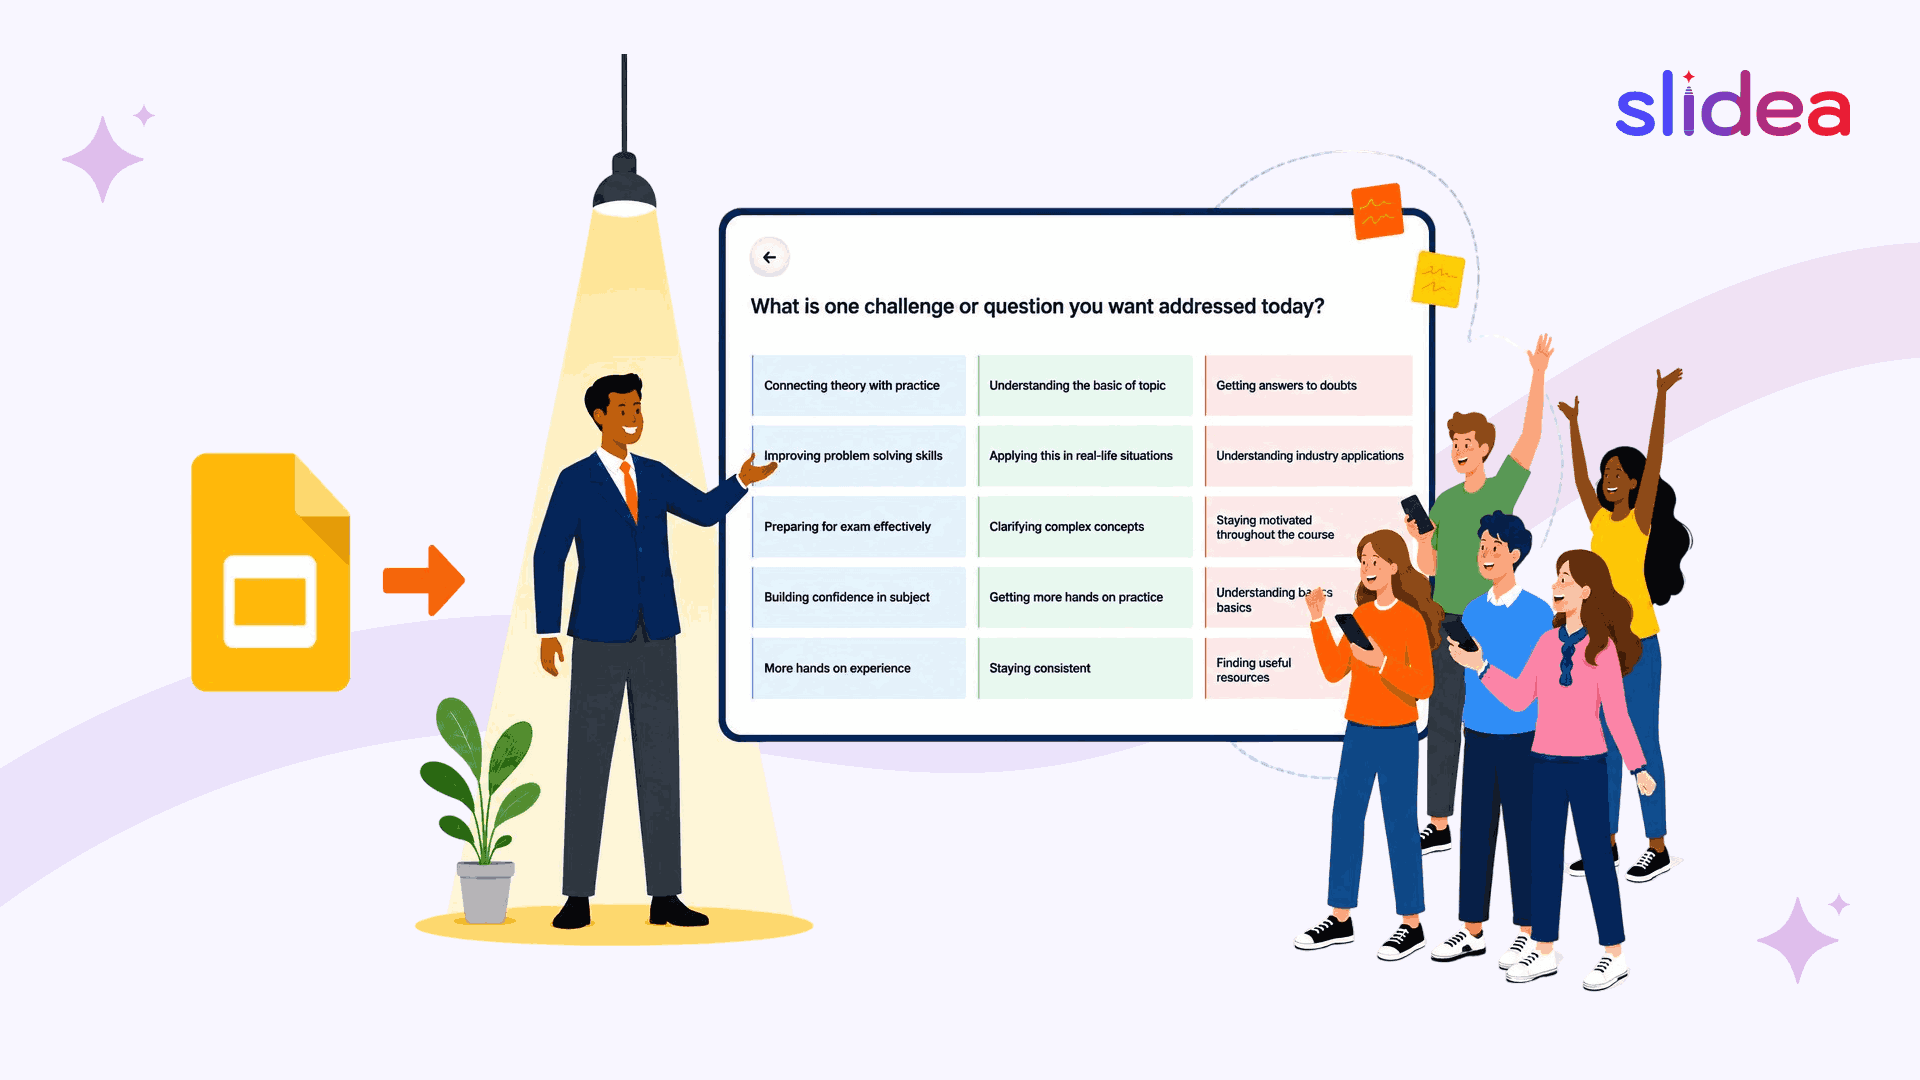
Step 1: Audit Your Deck and Identify Audience Participation Points
Before adding anything new, go through your existing slides and mark three types of moments. You are not changing any content at this stage. You are only identifying where audience participation belongs.
- The opening hook (slides 1 to 3) Mark your first participation point here. An opening poll or word cloud signals to the audience that this session will be different. It creates investment before you have said anything of substance.
- Check-in moments (every 10 to 15 minutes) Mark a check-in point every 10 to 15 slides. A comprehension check or quick poll here resets attention and gives you real-time intelligence about whether the audience is following you. A 30-minute presentation needs two check-in points. A 60-minute session needs four to five.
- The closing anchor (last 2 to 3 slides) Mark the final slides. Most decks end with a thank you slide that creates no energy. Your closing interaction is where a quiz, a word cloud takeaway, or an open-ended commitment question goes instead.
The result: a marked-up deck showing exactly where audience participation belongs, before you have opened any tool.
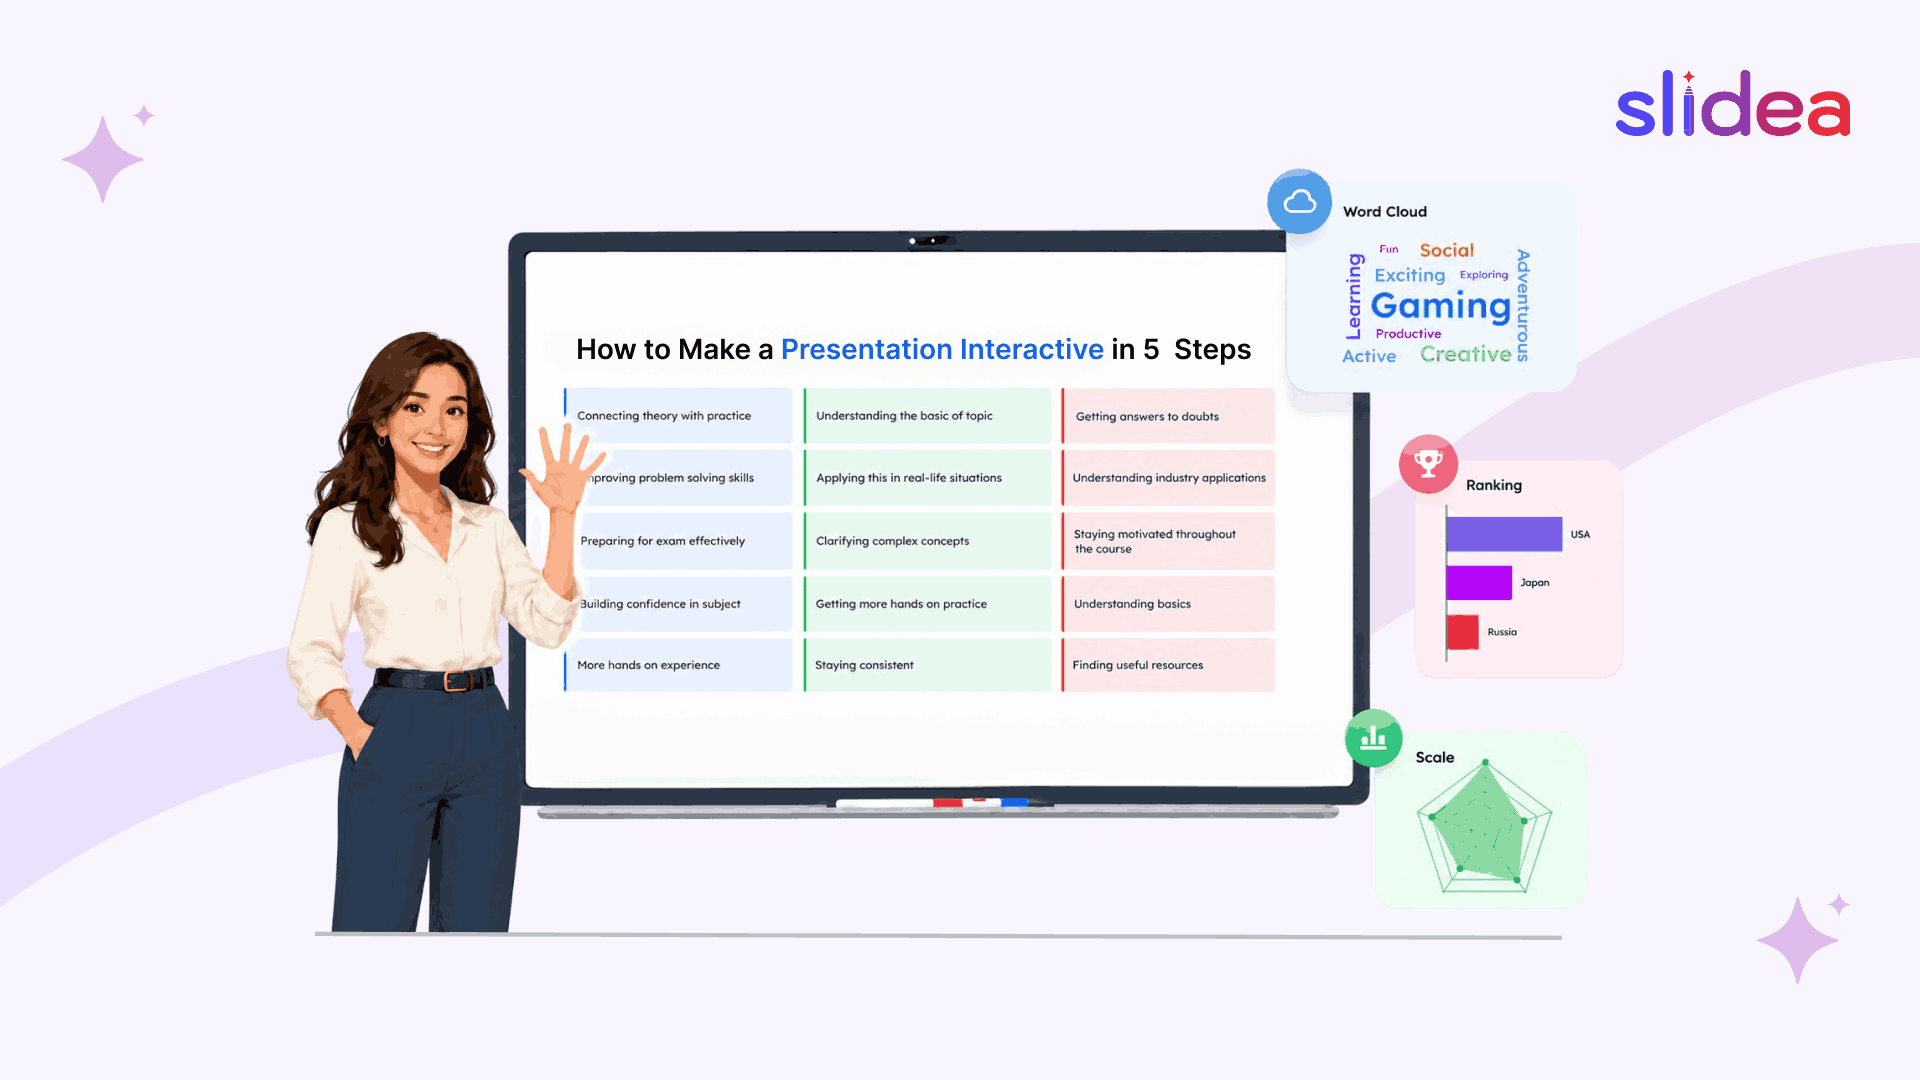
Step 2: Choose the Right Audience Interaction for Each Moment
Different interaction types serve different purposes. Placing the wrong type at the wrong moment consistently underdelivers. Here is the framework with one concrete example for each moment.
For opening moments: use low-stakes, visual interactions
A word cloud asking ‘In one word, what do you already know about today’s topic?’ takes 60 seconds, builds visually on screen as responses come in, and immediately shows the audience that their input is shaping the session. No wrong answers. No pressure. Instant investment.
For check-in moments: use diagnostic interactions
A Scales slide asking ‘How confident do you feel right now? 1 = completely lost, 5 = I could explain this to someone else’ gives you real comprehension data without anyone having to admit confusion publicly. If most of the room is at 1 or 2, you know to revisit before moving forward.
For closing moments: use consolidation interactions
An open-ended question asking ‘What is one thing you will do differently this week?’ creates a micro-commitment. The action typed on a phone is significantly more likely to be followed through than a verbal intention stated in a room.
For the entire session: run a live Q&A feed
Enable a live Q&A feed from the start. The audience submits questions at the moment of maximum curiosity rather than in a rushed five minutes at the end. The most upvoted questions rise to the top automatically and you address them at natural pause points.
For 15 ready-to-use ideas with sample questions across every audience type, see our guide to interactive presentation ideas for meetings, classrooms, training and events.
Step 3: Choose a Tool That Supports Live Audience Engagement
Once you know where interactions go and which types you need, choosing a tool becomes straightforward. The audience interaction decisions from Steps 1 and 2 matter far more than which platform you use.
When evaluating any tool for live audience engagement, look for four things:
- QR code joining: your audience joins by scanning a code or visiting a link on their phone, no app download required
- Native slide types: polls, quizzes, word clouds, and Q&A built directly into the presentation, not a separate tool you switch to mid-session
- Post-session analytics: participation data, quiz scores, and Q&A submissions saved automatically after every session
- Import compatibility: the ability to bring your existing PowerPoint or Google Slides deck in without rebuilding anything from scratch
Slidea covers all four in one platform. If you already have slides in Google Slides, see our guide on how to make Google Slides interactive for the exact import process.
Want to see what interactive slides actually look like before committing to a tool? Browse Slidea’s how-to guides to see each slide type in action.
Step 4: Set Up the Audience Joining and Participation Flow
This step is where many first-time interactive presenters make their most costly mistake. They build excellent interactive slides but forget to think about how the audience actually joins and participates.
Show joining instructions first
Display a joining screen as your very first slide. Say: ‘Before we start, take 30 seconds to join from your phone. Scan the QR code or visit the link on screen.’ Wait a full 30 seconds while the participant count rises. Then move to your opening interactive slide.
Your first poll or word cloud also doubles as a live test that everyone has joined successfully. If response numbers are low, give people another 30 seconds before continuing.
Configure these settings before going live
- Q&A enabled so the feed runs throughout the entire session from the start
- Anonymous responses on, particularly in educational and corporate settings where people are less likely to respond publicly
- Speaker notes visible so you can reference your questions without reading from a separate document
What to do if participation rates are low
Low audience participation almost always comes from one of three causes. The audience had not finished joining before the first interactive slide appeared. The opening question was too complex or too personal. Or participants did not understand how to respond.
Fix: keep your opening question simple and low-stakes. Say one sentence of instruction on your first interactive slide: ‘You should see this question on your phone, tap your answer.’ By the second interactive slide nobody needs guidance.
Step 5: Present, Adapt in Real Time, and Review Results
During the session: use the results
When poll results appear on screen, do not just acknowledge them and move on. Use them.
If 68% of the room voted for option B, spend your next two minutes on option B first. If a confidence check shows most of the room at 1 or 2, revisit the concept before continuing. If the Q&A feed shows five people asking a variation of the same question, answer it now rather than waiting.
This responsiveness is what makes audiences feel heard. The poll result is not a feature. It is intelligence. Use it.
After the session: review three things
- Participation data: slides with low response rates tell you what was unclear or appeared before everyone had joined
- Quiz data: questions where more than 30% chose the wrong answer are your weakest teaching moments, revise them before the next session
- Q&A data: unanswered questions that appear repeatedly across multiple sessions tell you exactly what to add to your deck next time
The presenters who improve fastest treat every session as a data collection exercise. After five sessions using this framework, you will have a clearer picture of what lands than years of presenting without analytics ever gave you.
Worked Example: 30-Minute Team Meeting
| Time | What happens |
| 0:00 | Joining instructions, 30 seconds |
| 0:30 | Poll: Which agenda item feels most urgent to you right now? |
| 1:00 | Content slides, Q&A feed collecting questions in background |
| 15:00 | Scales check: How confident do you feel about what we just covered? 1 to 5 |
| 15:30 | Presenter adapts based on results and continues |
| 27:00 | Top two Q&A questions addressed |
| 29:00 | Open Ended: What will you act on before we meet again? |
Total interaction time: under 4 minutes out of 30. Everything else: your existing content, unchanged.
Frequently Asked Questions
How many interactive slides should a presentation have?
For a 30-minute presentation, three to four interactive slides is the right range. For a 60-minute session, five to seven. The exact number matters less than the placement: one at the start to create investment, one every 10 to 15 minutes to maintain engagement, and one strong close to consolidate learning or capture a commitment.
Where should interactive slides be placed in a presentation?
Place one near the beginning, one every 10 to 15 minutes throughout, and one near the end. This keeps attention high without interrupting the flow. Step 1 above covers the exact placement logic.
Can I make an existing PowerPoint or Google Slides deck interactive without rebuilding it?
Yes. Most interactive presentation tools let you import existing decks and add interactive slides between your existing content. Your slides stay exactly as they are.
Do I need to be technical to add interactive elements?
No. Adding an interactive slide takes the same number of clicks as adding a regular content slide. The audience joins by scanning a QR code with no app download required.
Where can I find more interactive presentation resources?
Browse all presentation engagement articles on the Slidea blog for guides covering every audience type, tool, and use case.
Start With One Interaction
The most common reason presenters never make their presentations interactive is waiting for the perfect moment to start.
Add one word cloud as your very first slide in your next presentation. Give the audience 60 seconds to respond. See what happens in the room.
That single experience, watching your audience’s collective thinking appear on screen in real time, is more persuasive than anything this guide can tell you. Everything in this five-step framework builds from that first moment.
Ready to make your next presentation interactive? Browse Slidea’s interactive presentation templates and start with a ready-made poll, quiz, word cloud, or Q&A slide.

Leave a Comment
Your email address will not be published. Required fields are marked *